In this React tutorial, I will show you way to build React Typescript File Upload example using Hooks, Axios and Multipart File for making HTTP requests, Bootstrap for progress bar and display list of files’ information (with download url).
More Practice:
– Upload Image in React Typescript example (with Preview)
– React Typescript CRUD example
– React Hook Form Typescript example with Validation
– React Custom Hook in Typescript example
– React Query and Axios (Typescript) example
– Spring Boot + React Typescript example
Serverless with Firebase:
– React Typescript Firebase CRUD with Realtime Database
– React Typescript Firestore CRUD example with Cloud Firestore
Contents
- React Typescript File Upload Overview
- Technology
- Rest API for File Upload & Storage
- Project Structure
- Setup React Typescript File Upload Project
- Import Bootstrap to React Typescript File Upload App
- Initialize Axios for React Typescript Client
- Create Service for File Upload
- Create File Interface
- Create Page for Upload Files
- Add Files Upload Component to App Component
- Configure Port for React Typescript File Upload App
- Run the App
- Conclusion
- Further Reading
- Source Code
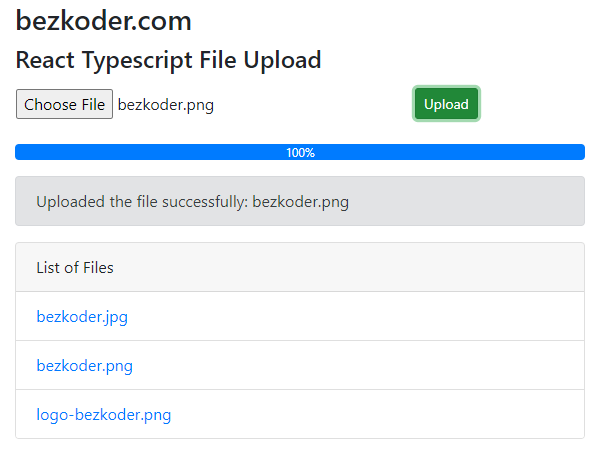
React Typescript File Upload Overview
We’re gonna create a React Typescript File Upload application in that user can:
- see the upload process (percentage) with progress bar
- view all uploaded files
- download link to file when clicking on the file name
Technology
- React 18/17/16
- Axios 0.27.2
- Bootstrap 4
Rest API for File Upload & Storage
Here are APIs that we will use Axios to make HTTP requests:
| Methods | Urls | Actions |
|---|---|---|
| POST | /upload | upload a File |
| GET | /files | get List of Files (name & url) |
| GET | /files/[filename] | download a File |
You can find how to implement the Rest APIs Server at one of following posts:
– Node Express File Upload Rest API example
– Node Express File Upload to MongoDB example
– Node Express File Upload to Google Cloud Storage example
– Spring Boot Multipart File upload (to static folder) example
Project Structure
After building the React Typescript project is done, the folder structure will look like this:
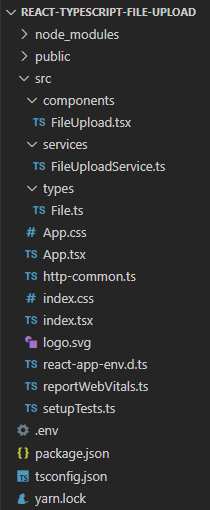
Let me explain it briefly.
– FileUploadService provides functions to save File and get Files using Axios.
– FileUpload contains file upload form, progress bar, display of list files.
– File exports IFile interface.
– App.tsx is the container that we embed all React components.
– http-common.ts initializes Axios with HTTP base Url and headers.
– We configure port for our App in .env
Setup React Typescript File Upload Project
Open cmd at the folder you want to save Project folder, run command:
npx create-react-app react-typescript-file-upload --template typescript
Or: yarn create react-app react-typescript-file-upload --template typescript
After the process is done. We create additional folders and files like the following tree:
public
src
components
FileUpload.tsx
services
FileUploadService.ts
types
File.ts
App.css
App.tsx
index.tsx
package.json
Import Bootstrap to React Typescript File Upload App
Run command: npm install [email protected].
Or: yarn add [email protected]
Open src/App.tsx and modify the code inside it as following-
import "bootstrap/dist/css/bootstrap.min.css";
import "./App.css";

const App: React.FC = () => {
  return (
    ...
  );
}

export default App;
Initialize Axios for React Typescript Client
Let’s install axios with command: npm install [email protected].
Or: yarn add [email protected]
Under src folder, we create http-common.ts file with following code:
import axios from "axios";

export default axios.create({
  baseURL: "http://localhost:8080",
  headers: {
    "Content-type": "application/json",
  },
});
You can change the baseURL that depends on REST APIs url that your Server configures.
Create Service for File Upload
This service will use Axios to send HTTP requests.
There are 2 functions:
upload(file): POST form data with a callback for tracking upload progressgetFiles(): GET list of Files’ information
services/FileUploadService.ts
import http from "../http-common";

const upload = (file: File, onUploadProgress: any): Promise<any> => {
  let formData = new FormData();

  formData.append("file", file);

  return http.post("/upload", formData, {
    headers: {
      "Content-Type": "multipart/form-data",
    },
    onUploadProgress,
  });
};

const getFiles = () : Promise<any> => {
  return http.get("/files");
};

const FileUploadService = {
  upload,
  getFiles,
};

export default FileUploadService;
– First we import Axios as http from http-common.ts.
– Inside upload() method, we use FormData to store key-value pairs. It helps to build an object which corresponds to HTML form using append() method.
– We pass onUploadProgress to exposes progress events. This progress event are expensive (change detection for each event), so you should only use when you want to monitor it.
– We call Axios post() to send an HTTP POST for uploading a File to Rest APIs Server and get() method for HTTP GET request to retrieve all stored files.
Create File Interface
We will export a IFile type with 2 properties: url and name.
types/File.ts
export default interface IFile {
  url: string,
  name: string,
}
Create Page for Upload Files
Let’s create a File Upload UI with Progress Bar, Card, Button and Message.
First we create a React template with React Hooks (useState, useEffect) and import FileUploadService:
components/FileUpload.tsx
import { useState, useEffect } from "react";
import UploadService from "../services/FileUploadService";

const FileUpload: React.FC = () => {

  return (

  );
};
Then we define the state using React Hooks:
...
import IFile from "../types/File";

const FileUpload: React.FC = () => {
  const [currentFile, setCurrentFile] = useState<File>();
  const [progress, setProgress] = useState<number>(0);
  const [message, setMessage] = useState<string>("");
  const [fileInfos, setFileInfos] = useState<Array<IFile>>([]);

  ...
};
Next we define selectFile() method which helps us to get the selected Files from <input type="file" > element later.
const FileUpload: React.FC = () => {
  ...
  const selectFile = (event: React.ChangeEvent<HTMLInputElement>) => {
    const { files } = event.target;
    const selectedFiles = files as FileList;
    setCurrentFile(selectedFiles?.[0]);
    setProgress(0);
  };

  ...
}
We use selectedFiles for accessing current File as the first Item.
Then we call UploadService.upload() method on the currentFile with a callback. So create following upload() method:
const FileUpload: React.FC = () => {
  ...
  const upload = () => {
    setProgress(0);
    if (!currentFile) return;

    UploadService.upload(currentFile, (event: any) => {
      setProgress(Math.round((100 * event.loaded) / event.total));
    })
      .then((response) => {
        setMessage(response.data.message);
        return UploadService.getFiles();
      })
      .then((files) => {
        setFileInfos(files.data);
      })
      .catch((err) => {
        setProgress(0);

        if (err.response && err.response.data && err.response.data.message) {
          setMessage(err.response.data.message);
        } else {
          setMessage("Could not upload the File!");
        }

        setCurrentFile(undefined);
      });
  };

  ...
}
The progress will be calculated basing on event.loaded and event.total.
If the transmission is done, we call UploadService.getFiles() to get the files’ information and assign the result to fileInfos state, which is an array of {name, url} objects.
We also need to do this work in the Effect Hook useEffect() method which serves the same purpose as componentDidMount():
const FileUpload: React.FC = () => {
  ...
  useEffect(() => {
    UploadService.getFiles().then((response) => {
      setFileInfos(response.data);
    });
  }, []);

  ...
}
Now we return the Upload File UI. Add the following code inside return() block:
const FileUpload: React.FC = () => {
  ...

  return (
    <div>
      <div className="row">
        <div className="col-8">
          <label className="btn btn-default p-0">
            <input type="file" onChange={selectFile} />
          </label>
        </div>

        <div className="col-4">
          <button
            className="btn btn-success btn-sm"
            disabled={!currentFile}
            onClick={upload}
          >
            Upload
          </button>
        </div>
      </div>

      {currentFile && (
        <div className="progress my-3">
          <div
            className="progress-bar progress-bar-info"
            role="progressbar"
            aria-valuenow={progress}
            aria-valuemin={0}
            aria-valuemax={100}
            style={{ width: progress + "%" }}
          >
            {progress}%
          </div>
        </div>
      )}

      {message && (
        <div className="alert alert-secondary mt-3" role="alert">
          {message}
        </div>
      )}

      <div className="card mt-3">
        <div className="card-header">List of Files</div>
        <ul className="list-group list-group-flush">
          {fileInfos &&
            fileInfos.map((file, index) => (
              <li className="list-group-item" key={index}>
                <a href={file.url}>{file.name}</a>
              </li>
            ))}
        </ul>
      </div>
    </div>
  );
};
In the code above, we use Bootstrap Progress Bar:
.progressas a wrapper- inner
.progress-barto indicate the progress .progress-barrequiresstyleto set the width by percentage.progress-baralso requiresroleand some aria attributes to make it accessible- label of the progress bar is the text within it
To display List of uploaded files, we iterate over fileInfos array using map() function. On each file item, we use file.url as href attribute and file.name for showing text.
Don’t forget to export the function component:
const FileUpload: React.FC = () => {
  ...
}

export default FileUpload;
You can simplify import statement with:
Absolute Import in React
Add Files Upload Component to App Component
Open App.tsx, import and embed the FileUpload Component tag.
import "bootstrap/dist/css/bootstrap.min.css";
import "./App.css";

import FileUpload from "./components/FileUpload";

const App: React.FC = () => {
  return (
    <div className="container" style={{ width: "600px" }}>
      <div className="my-3">
        <h3>bezkoder.com</h3>
        <h4>React Typescript File Upload</h4>
      </div>

      <FileUpload />
    </div>
  );
}

export default App;
Configure Port for React Typescript File Upload App
Because most of HTTP Server use CORS configuration that accepts resource sharing restricted to some sites or ports, and if you use the Project in this post for making Server, you need to configure port for our App.
In project folder, create .env file with following content:
PORT=8081
So our app will run at port 8081.
Run the App
You can find how to implement the Rest APIs Server at one of following posts:
– Node Express File Upload Rest API example
– Node Express File Upload to MongoDB example
– Node Express File Upload to Google Cloud Storage example
– Spring Boot Multipart File upload (to static folder) example
Or: Spring Boot Multipart File upload (to database) example
Run this React Typescript File Upload App with command: npm start.
Or: yarn start
Open Browser with url http://localhost:8081/ and check the result.
Conclusion
Today we’re learned how to build a React Typescript application for upload Files using Hooks, Axios, Bootstrap with Progress Bar. We also provide the ability to show list of files, upload progress percentage, and to download file from the server.
For Multiple Files Upload like this:

Please visit:
React Multiple File upload example with Typescript
Happy Learning! See you again.
Further Reading
– React Typescript CRUD example
– React Hook Form Typescript example with Validation
– React Custom Hook in Typescript example
– React Query and Axios (Typescript) example
– Spring Boot + React Typescript example
Serverless with Firebase:
– React Typescript Firebase CRUD with Realtime Database
– React Typescript Firestore CRUD example with Cloud Firestore
Fullstack:
– React + Spring Boot + MySQL: CRUD example
– React + Spring Boot + PostgreSQL: CRUD example
– React + Spring Boot + MongoDB: CRUD example
– React + Node + Express + MySQL: CRUD example
– React + Node + Express + PostgreSQL example
React Redux + Node + Express + MySQL: CRUD example
– React + Node + Express + MongoDB exampleReact + Django + Rest Framework example
Source Code
You can find the complete source code for this tutorial at Github.
– React Multiple File upload example with Typescript
– Upload Image in React Typescript example (with Preview)
– Drag-Drop instead: Drag and Drop File Upload with React Hooks example