In this tutorial, I will show you File upload using Spring WebFlux example. We also use Spring FilePart interface to handle HTTP multi-part requests.
This Spring Boot App works with:
– Angular 8 / Angular 10 / Angular 11 / Angular 12 / Angular 13 / Angular 14 / Angular 15 / Angular 16
– Angular Material 12
– Vue Client / Vuetify Client
– React Client / React Hooks Client
– React Image Upload with Preview
– Material UI Client
– Axios Client
Related Posts:
– Spring Boot Delete File example
– Spring Boot WebFlux Rest API example
– Spring Boot Thymeleaf File Upload example
– How to upload multiple files in Java Spring Boot
– Spring Boot Upload/Download File to/from Database example
– Spring Boot: Upload/Import Excel file data into MySQL Database
– Spring Boot: Upload/Import CSV file data into MySQL Database
– Documentation: Spring Boot Swagger 3 example
– Caching: Spring Boot Redis Cache example
– Spring Boot + GraphQL example
Deployment: Deploy Spring Boot App on AWS – Elastic Beanstalk
Contents
- Spring WebFlux File upload example Overview
- Technology
- Project Structure
- Setup Spring Boot project
- Create Service for File Storage
- Define Data Models
- Define Response Message
- Create Controller for upload & download Files
- Configure Multipart File for WebFlux
- Handle WebFlux File Upload Exception
- Initialize Storage
- Run & Test
- Source Code
- Conclusion
- Further Reading
Spring WebFlux File upload example Overview
Our Spring Boot Reactive Web – WebFlux File Upload Application will provide API for:
- uploading File to a static folder in the Server
- downloading File from server with the link
- getting list of Files’ information (file name & url)
These are APIs to be exported:
| Methods | Urls | Actions |
|---|---|---|
| POST | /upload | upload a File |
| GET | /files | get List of Files (name & url) |
| GET | /files/[filename] | download a File |
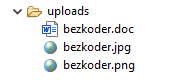
This is the static folder that stores all uploaded files:
For deleting file, kindly visit:
Spring Boot Delete File example
If you want to store files in database like this:

You can find instruction at:
Spring Boot Upload/Download File to/from Database example
Technology
- Java 17/11
- Spring Boot 3/2 (with Spring WebFlux)
- Maven 3.6.1
Project Structure
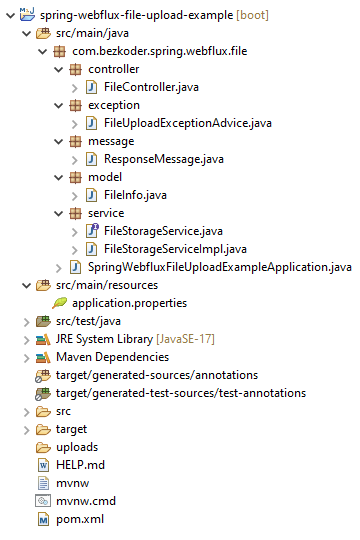
Let me explain it briefly.
– FileInfo contains information of the uploaded file.
– FileStorageService helps us to initialize storage, upload file, load file, get list of Files’ info, delete files.
– FileController uses FileStorageService to export Rest APIs: POST a file, GET all files’ information, GET a File.
– FileUploadExceptionAdvice handles exception when the controller processes file upload.
– application.properties contains configuration for WebFlux Multipart.
– uploads is the static folder for storing files.
– pom.xml for Spring Boot dependency.
Setup Spring Boot project
Use Spring web tool or your development tool (Spring Tool Suite, Eclipse, Intellij) to create a Spring Boot project.
Then open pom.xml and add WebFlux dependency:
<dependency>
  <groupId>org.springframework.boot</groupId>
  <artifactId>spring-boot-starter-webflux</artifactId>
</dependency>
Create Service for File Storage
First we need an interface that will be autowired in the Controller.
In service folder, create FileStorageService interface like following code:
service/FileStorageService.java
package com.bezkoder.spring.webflux.file.service;

import java.nio.file.Path;
import java.util.stream.Stream;

import org.springframework.core.io.buffer.DataBuffer;
import org.springframework.http.codec.multipart.FilePart;

import reactor.core.publisher.Flux;
import reactor.core.publisher.Mono;

public interface FileStorageService {
  public void init();

  public Mono<String> save(Mono<FilePart> filePartMono);

  public Flux<DataBuffer> load(String filename);

  public Stream<Path> loadAll();
}
Now we create implementation of the interface.
service/FileStorageServiceImpl.java
package com.bezkoder.spring.webflux.file.service;

import java.io.IOException;
import java.net.MalformedURLException;
import java.nio.file.Files;
import java.nio.file.Path;
import java.nio.file.Paths;
import java.util.stream.Stream;

import org.springframework.core.io.Resource;
import org.springframework.core.io.UrlResource;
import org.springframework.core.io.buffer.DataBuffer;
import org.springframework.core.io.buffer.DataBufferUtils;
import org.springframework.core.io.buffer.DefaultDataBufferFactory;
import org.springframework.http.codec.multipart.FilePart;
import org.springframework.stereotype.Service;

import reactor.core.publisher.Flux;
import reactor.core.publisher.Mono;

@Service
public class FileStorageServiceImpl implements FileStorageService {

  private final Path root = Paths.get("uploads");

  @Override
  public void init() {
    try {
      Files.createDirectories(root);
    } catch (IOException e) {
      throw new RuntimeException("Could not initialize folder for upload!");
    }
  }

  @Override
  public Mono<String> save(Mono<FilePart> filePartMono) {

    return filePartMono.doOnNext(fp -> System.out.println("Receiving File:" + fp.filename())).flatMap(filePart -> {
      String filename = filePart.filename();
      return filePart.transferTo(root.resolve(filename)).then(Mono.just(filename));
    });
  }

  @Override
  public Flux<DataBuffer> load(String filename) {
    try {
      Path file = root.resolve(filename);
      Resource resource = new UrlResource(file.toUri());

      if (resource.exists() || resource.isReadable()) {
        return DataBufferUtils.read(resource, new DefaultDataBufferFactory(), 4096);
      } else {
        throw new RuntimeException("Could not read the file!");
      }
    } catch (MalformedURLException e) {
      throw new RuntimeException("Error: " + e.getMessage());
    }
  }

  @Override
  public Stream<Path> loadAll() {
    try {
      return Files.walk(this.root, 1)
          .filter(path -> !path.equals(this.root))
          .map(this.root::relativize);
    } catch (IOException e) {
      throw new RuntimeException("Could not load the files!");
    }
  }
}
Define Data Models
Let’s create FileInfo model which has fields: name & url.
model/FileInfo.java
package com.bezkoder.spring.webflux.file.model;

public class FileInfo {
  private String name;
  private String url;

  public FileInfo(String name, String url) {
    this.name = name;
    this.url = url;
  }

  public String getName() {
    return this.name;
  }

  public void setName(String name) {
    this.name = name;
  }

  public String getUrl() {
    return this.url;
  }

  public void setUrl(String url) {
    this.url = url;
  }
}
Define Response Message
The ResponseMessage is for message to client that we’re gonna use in Rest Controller and Exception Handler.
message/ResponseMessage.java
package com.bezkoder.spring.webflux.file.message;

public class ResponseMessage {
  private String message;

  public ResponseMessage(String message) {
    this.message = message;
  }

  public String getMessage() {
    return message;
  }

  public void setMessage(String message) {
    this.message = message;
  }
}
Create Controller for upload & download Files
In controller package, we create FileController.
controller/FileController.java
package com.bezkoder.spring.webflux.file.controller;

import org.springframework.beans.factory.annotation.Autowired;
import org.springframework.core.io.buffer.DataBuffer;
import org.springframework.http.HttpHeaders;
import org.springframework.http.HttpStatus;
import org.springframework.http.MediaType;
import org.springframework.http.ResponseEntity;
import org.springframework.http.codec.multipart.FilePart;
import org.springframework.stereotype.Controller;
import org.springframework.web.bind.annotation.CrossOrigin;
import org.springframework.web.bind.annotation.DeleteMapping;
import org.springframework.web.bind.annotation.GetMapping;
import org.springframework.web.bind.annotation.PathVariable;
import org.springframework.web.bind.annotation.PostMapping;
import org.springframework.web.bind.annotation.RequestPart;
import org.springframework.web.util.UriComponentsBuilder;

import java.util.stream.Stream;

import com.bezkoder.spring.webflux.file.message.ResponseMessage;
import com.bezkoder.spring.webflux.file.model.FileInfo;
import com.bezkoder.spring.webflux.file.service.FileStorageService;

import reactor.core.publisher.Flux;
import reactor.core.publisher.Mono;

@Controller
@CrossOrigin("http://localhost:8081")
public class FileController {
  @Autowired
  FileStorageService storageService;

  @PostMapping("/upload")
  public Mono<ResponseEntity<ResponseMessage>> uploadFile(@RequestPart("file") Mono<FilePart> filePartMono) {
    return storageService.save(filePartMono).map(
        (filename) -> ResponseEntity.ok().body(new ResponseMessage("Uploaded the file successfully: " + filename)));
  }

  @GetMapping("/files")
  public ResponseEntity<Flux<FileInfo>> getListFiles() {
    Stream<FileInfo> fileInfoStream = storageService.loadAll().map(path -> {
      String filename = path.getFileName().toString();
      String url = UriComponentsBuilder.newInstance().path("/files/{filename}").buildAndExpand(filename).toUriString();
      return new FileInfo(filename, url);
    });

    Flux<FileInfo> fileInfosFlux = Flux.fromStream(fileInfoStream);

    return ResponseEntity.status(HttpStatus.OK).body(fileInfosFlux);
  }

  @GetMapping("/files/{filename:.+}")
  public ResponseEntity<Flux<DataBuffer>> getFile(@PathVariable String filename) {
    Flux<DataBuffer> file = storageService.load(filename);

    return ResponseEntity.ok().header(HttpHeaders.CONTENT_DISPOSITION, "attachment; filename=\"" + filename + "\"")
        .contentType(MediaType.APPLICATION_OCTET_STREAM).body(file);
  }
}
– @CrossOrigin is for configuring allowed origins.
– @Controller annotation is used to define a controller.
– @GetMapping and @PostMapping annotation is for mapping HTTP GET & POST requests onto specific handler methods:
- POST /upload:
uploadFile() - GET /files:
getListFiles() - GET /files/[filename]:
getFile()
– We use @Autowired to inject implementation of FileStorageService bean to local variable.
Configure Multipart File for WebFlux
Let’s configure some WebFlux Properties in application.properties as following:
spring.webflux.multipart.max-in-memory-size=512KB
spring.webflux.multipart.max-parts=3
spring.webflux.multipart.max-disk-usage-per-part=1024KB
spring.webflux.multipart.max-headers-size=5KB
spring.webflux.multipart.max-in-memory-size: maximum amount of memory allowed per part before it’s written to disk. The default is256KB, set to-1to store all contents in memory. This limit is not applicable if streaming is enabled.spring.webflux.multipart.max-parts: maximum number of parts allowed in a given multipart request. The default is no limit (-1).spring.webflux.multipart.max-disk-usage-per-part: maximum amount of disk space allowed per part. The default is no limit (-1). This limit is not applicable if streaming is enabled.spring.webflux.multipart.max-headers-size: maximum amount of memory allowed per headers section of each part. The default is10KB, set to-1to enforce no limits.
Handle WebFlux File Upload Exception
This is where we handle the case in that a request exceeds Max Upload Size. The system will throw DataBufferLimitException and we’re gonna use @ControllerAdvice with @ExceptionHandlerannotation for handling the exceptions.
exception/FileUploadExceptionAdvice.java
package com.bezkoder.spring.webflux.file.exception;

import org.springframework.core.io.buffer.DataBufferLimitException;
import org.springframework.http.HttpStatus;
import org.springframework.http.ResponseEntity;
import org.springframework.web.bind.annotation.ControllerAdvice;
import org.springframework.web.bind.annotation.ExceptionHandler;
import org.springframework.web.reactive.result.method.annotation.ResponseEntityExceptionHandler;

import com.bezkoder.spring.webflux.file.message.ResponseMessage;

@ControllerAdvice
public class FileUploadExceptionAdvice extends ResponseEntityExceptionHandler {

  @ExceptionHandler(DataBufferLimitException.class)
  public ResponseEntity<ResponseMessage> handleMaxSizeException(DataBufferLimitException exc) {
    return ResponseEntity.status(HttpStatus.EXPECTATION_FAILED).body(new ResponseMessage("File is too large!"));
  }
}
Initialize Storage
We need to run init() method of FilesStorageService. So open SpringBootUploadFilesApplication.java and implement CommandLineRunner for run() method like this:
package com.bezkoder.spring.webflux.file;

import org.springframework.boot.CommandLineRunner;
import org.springframework.boot.SpringApplication;
import org.springframework.boot.autoconfigure.SpringBootApplication;

import com.bezkoder.spring.webflux.file.service.FileStorageService;

import jakarta.annotation.Resource;

@SpringBootApplication
public class SpringWebfluxFileUploadExampleApplication implements CommandLineRunner {

  @Resource
  FileStorageService storageService;

  public static void main(String[] args) {
    SpringApplication.run(SpringWebfluxFileUploadExampleApplication.class, args);
  }

  @Override
  public void run(String... arg) throws Exception {
    storageService.init();
  }
}
Run & Test
Run Spring Boot application with command: mvn spring-boot:run.
Refresh the project directory and you will see uploads folder inside it.
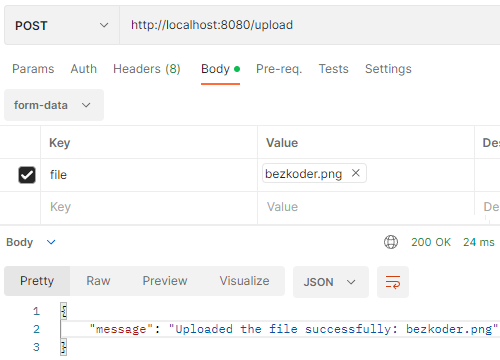
Let’s use Postman to make some requests.
– Upload some files:
– Check uploads folder:
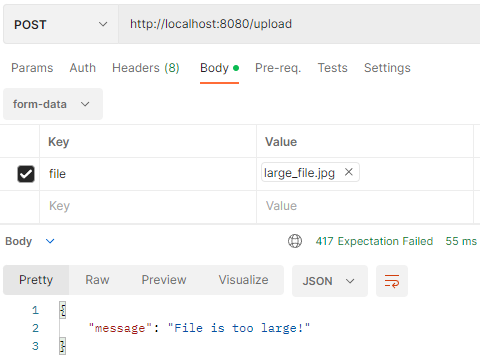
– Upload a file with size larger than max file size (1024KB):
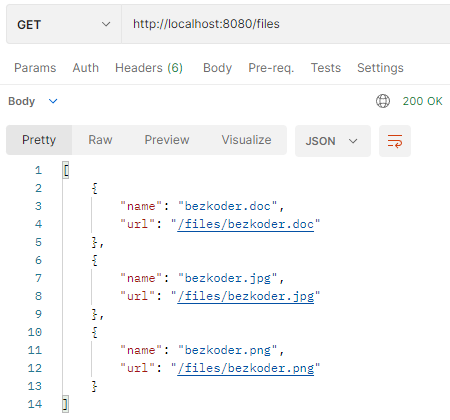
– Retrieve list of Files’ information:
– Now you can download any file from one of the paths above.
For example: http://localhost:8080/files/bezkoder.png.
Source Code
You can find the complete source code for this tutorial on Github.
With Template Engine:
Spring Boot Thymeleaf File Upload example
Conclusion
Today we’ve learned how to create Spring Boot WebFlux File Upload Rest Api example to upload multipart files using Spring FilePart and get files’ information with static folder.
Following tutorials explain how to build Front-end Apps to work with our Spring Boot Server:
– Angular 8 / Angular 10 / Angular 11 / Angular 12 / Angular 13 / Angular 14 / Angular 15 / Angular 16
– Angular Material 12
– Vue Client / Vuetify Client
– React Client / React Hooks Client
– React Image Upload with Preview
– Material UI Client
– Axios Client
For deleting file:
Spring Boot Delete File example
You can also know way to upload an Excel/CSV file and store the content in MySQL database with the post:
– Spring Boot: Upload/Import Excel file data into MySQL Database
– Spring Boot: Upload/Import CSV file data into MySQL Database
If you want to store files in database like this:
You can find instruction at:
Spring Boot Upload/Download File to/from Database example
Happy Learning! See you again.
Further Reading
- Multipart Content-Type
- Spring FilePart
- Spring Boot WebFlux Rest API example
- Spring Boot upload Image and Display with Thymeleaf
- Spring Boot + GraphQL example
- Documentation: Spring Boot + Swagger 3 example (with OpenAPI 3)
- Caching: Spring Boot Redis Cache example