In this tutorial, I will show you how to document REST API with Swagger 3 in Spring Boot example (following OpenAPI 3 specification). You will also know several ways to configure Swagger API description and response.
You can also apply this tutorial on following Projects:
– Spring Boot 3 Rest API example
– Spring Boot Rest API with H2
– Spring Boot Rest API with MySQL
– Spring Boot Rest API with PostgreSQL
– Spring Boot Rest API with MongoDB
– Spring Boot Rest API with SQL Server
– Spring Boot Rest API with Cassandra
– Spring Boot Rest API with Oracle
More Practice:
– Swagger 3 annotations example
– @RestController vs @Controller annotation
– Spring Boot WebFlux Rest API example
– Spring Boot Security and JWT tutorial with example
– Spring Boot @ControllerAdvice & @ExceptionHandler example
– @RestControllerAdvice example in Spring Boot
– Spring Boot Unit Test for Rest Controller
– Caching: Spring Boot Redis Cache example
– Spring Boot + GraphQL example
Contents
Overview
OpenAPI 3
“The OpenAPI Specification (OAS) defines a standard, language-agnostic interface to RESTful APIs which allows both humans and computers to discover and understand the capabilities of the service without access to source code, documentation, or through network traffic inspection.” – Swagger website about OpenAPI Specification
(You can also find the document for OpenAPI at: openapis.org.)
With version 3.1.0, the OpenAPI Specification sets forth a set of guidelines for API development and documentation, encompassing versioning, schema, document structure, and other critical elements, which contributes to creating reliable and consistent APIs.
Swagger 3
The OpenAPI specification defines the industry-standard specification for designing REST APIs, while Swagger provides a range of tools (Swagger Editor, Swagger UI, Swagger Codegen…) to support the development, testing, and documentation of these APIs. So we can think about Swagger 3 as OpenAPI 3 specification implementation.
Swagger 3 vs OpenAPI 3?
- All Swagger tools, which are supported by SmartBear Software, utilize OpenAPI Specification.
- But not all OpenAPI tools are Swagger tools. There are many open source and pro tools, which are not related to Swagger, support the OpenAPI 3 Specification.
springdoc-openapi
Springdoc-openapi is a library that integrates with the Spring Boot framework to automatically generate OpenAPI documentation for REST APIs. It allows developers to describe their API endpoints and models using annotations and generates an OpenAPI specification in either JSON or YAML format.
It also supports various features of the OpenAPI 3 specification, such as security definitions, schema validation, and JSON Web Token (JWT) authentication.
Additionally, it integrates with other Spring Boot libraries, such as Spring WebMvc/WebFlux, Spring Data Rest, Spring Security and Spring Cloud Function Web, to automatically generate documentation for these components as well.
Spring Boot Swagger 3 example
Rest API
Assume that we have Spring Boot Application that exposes Rest APIs for a Tutorial application in that:
- Each Tutorial has id, title, description, published status.
- Apis help to create, retrieve, update, delete Tutorials.
- Apis also support custom finder methods such as find by published status or by title.
| Methods | Urls | Actions |
|---|---|---|
| POST | /api/tutorials | create new Tutorial |
| GET | /api/tutorials | retrieve all Tutorials |
| GET | /api/tutorials/:id | retrieve a Tutorial by :id |
| PUT | /api/tutorials/:id | update a Tutorial by :id |
| DELETE | /api/tutorials/:id | delete a Tutorial by :id |
| DELETE | /api/tutorials | delete all Tutorials |
| GET | /api/tutorials/published | find all published Tutorials |
| GET | /api/tutorials?title=[keyword] | find all Tutorials which title contains keyword |
You can find how to implement this Rest API server in one of following tutorials (with Github):
– Spring Boot 3 Rest API example
– Spring Boot Rest API with H2
– Spring Boot Rest API with MySQL
– Spring Boot Rest API with PostgreSQL
– Spring Boot Rest API with MongoDB
– Spring Boot Rest API with SQL Server
– Spring Boot Rest API with Cassandra
– Spring Boot Rest API with Oracle
Spring Boot Swagger 3 Maven dependency
– For Spring Boot 3:
To use Swagger 3 in your Maven project, you need to add the springdoc-openapi-starter-webmvc-ui dependency to your project’s pom.xml file:
<dependency>
  <groupId>org.springdoc</groupId>
  <artifactId>springdoc-openapi-starter-webmvc-ui</artifactId>
  <version>2.0.3</version>
</dependency>
– For Spring Boot 2:
With earlier version of Spring Boot, you can use springdoc-openapi-ui dependency:
<dependency>
  <groupId>org.springdoc</groupId>
  <artifactId>springdoc-openapi-ui</artifactId>
  <version>1.6.15</version>
</dependency>
Spring Boot Swagger Gradle dependency
– For Spring Boot 3:
To use Swagger 3 in your Gradle project, you need to add the springdoc-openapi-starter-webmvc-ui dependency to your project’s build.gradle file:
implementation group: 'org.springdoc', name: 'springdoc-openapi-starter-webmvc-ui', version: '2.0.3'
– For Spring Boot 2:
With earlier version of Spring Boot, you can use springdoc-openapi-ui dependency:
implementation group: 'org.springdoc', name: 'springdoc-openapi-ui', version: '1.6.15'
Run and Check
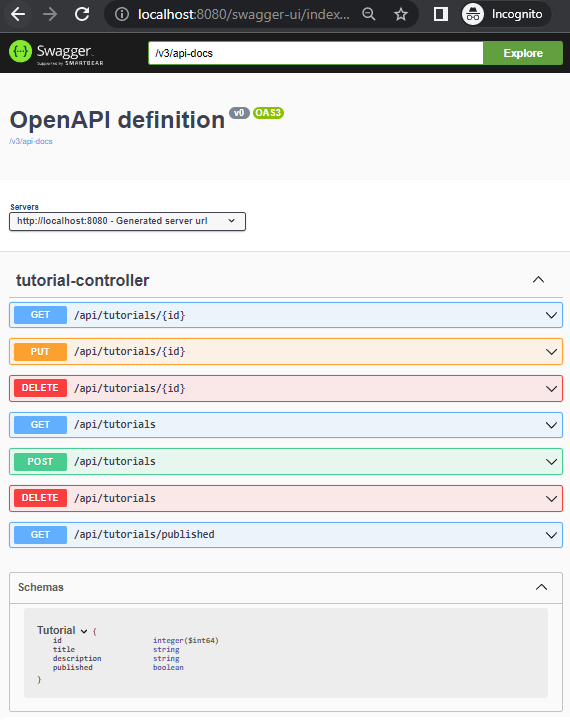
Run Spring Boot project. Open browser with url:
http://localhost:8080/swagger-ui/index.html
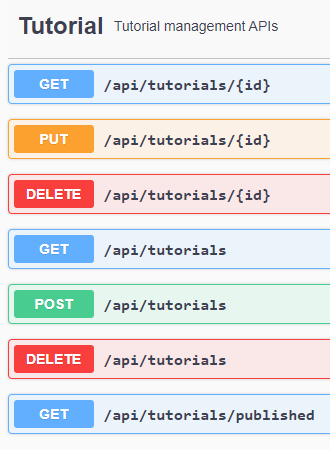
You can see:
Open http://localhost:8080/v3/api-docs, you will see document in Json format:
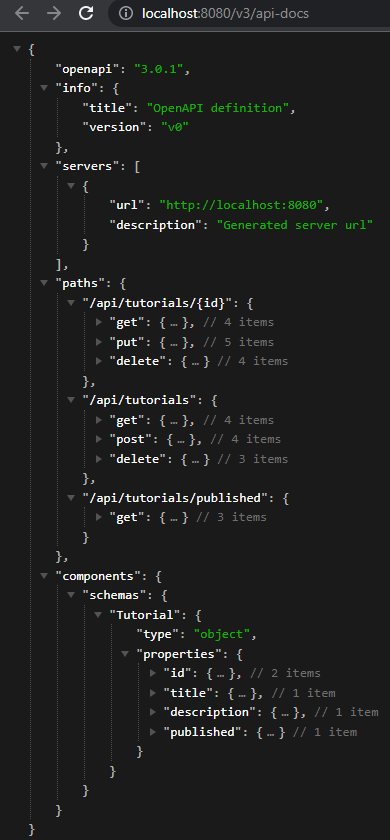
This is very simple. Let’s continue to explore more practice with OpenAPI / Swagger 3.
Spring Boot and Swagger API description
Before you start documenting the API, you may first define API description with its basic information, which includes the base URL (development and production environment), title, version, author contact, description, license…
Now define OpenAPIConfig class with OpenAPI bean like following code:
config/OpenAPIConfig.java
package com.bezkoder.spring.swagger.config;

import java.util.List;

import org.springframework.beans.factory.annotation.Value;
import org.springframework.context.annotation.Bean;
import org.springframework.context.annotation.Configuration;

import io.swagger.v3.oas.models.OpenAPI;
import io.swagger.v3.oas.models.info.Contact;
import io.swagger.v3.oas.models.info.Info;
import io.swagger.v3.oas.models.info.License;
import io.swagger.v3.oas.models.servers.Server;

@Configuration
public class OpenAPIConfig {

  @Value("${bezkoder.openapi.dev-url}")
  private String devUrl;

  @Value("${bezkoder.openapi.prod-url}")
  private String prodUrl;

  @Bean
  public OpenAPI myOpenAPI() {
    Server devServer = new Server();
    devServer.setUrl(devUrl);
    devServer.setDescription("Server URL in Development environment");

    Server prodServer = new Server();
    prodServer.setUrl(prodUrl);
    prodServer.setDescription("Server URL in Production environment");

    Contact contact = new Contact();
    contact.setEmail("[email protected]");
    contact.setName("BezKoder");
    contact.setUrl("https://www.bezkoder.com");

    License mitLicense = new License().name("MIT License").url("https://choosealicense.com/licenses/mit/");

    Info info = new Info()
        .title("Tutorial Management API")
        .version("1.0")
        .contact(contact)
        .description("This API exposes endpoints to manage tutorials.").termsOfService("https://www.bezkoder.com/terms")
        .license(mitLicense);

    return new OpenAPI().info(info).servers(List.of(devServer, prodServer));
  }
}
In application.properties file:
bezkoder.openapi.dev-url=http://localhost:8080
bezkoder.openapi.prod-url=https://bezkoder-api.com
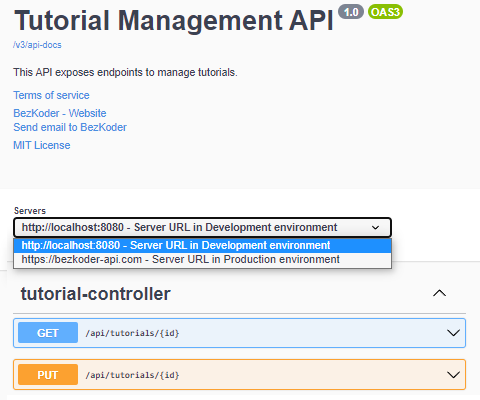
Run the project and you can see the OpenAPI 3 configuration will be loaded:
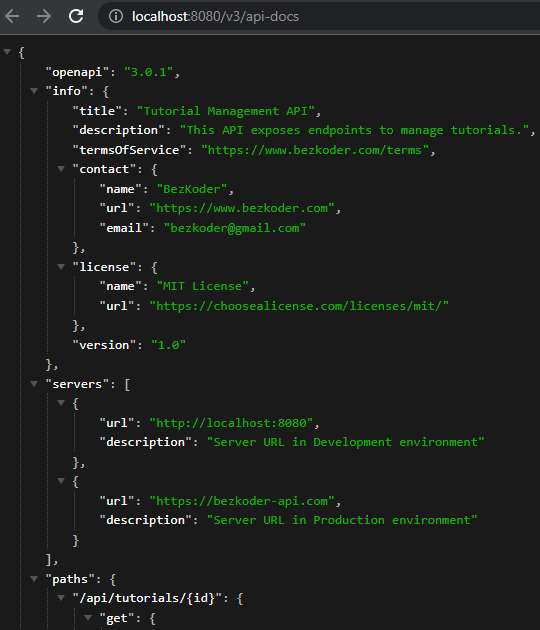
And http://localhost:8080/v3/api-docs:
For making API description for Rest Controller or each HTTP request, we continue with Swagger annotations.
By default, the name for the group of endpoints is tutorial-controller. We can change it to Tutorials (with description) using @Tag annotation.
Just update TutorialController.java:
import io.swagger.v3.oas.annotations.tags.Tag;

@Tag(name = "Tutorial", description = "Tutorial management APIs")
@RestController
public class TutorialController {

}
And the result will be like this:
Let’s practice more with following example.
Spring Boot and Swagger response example
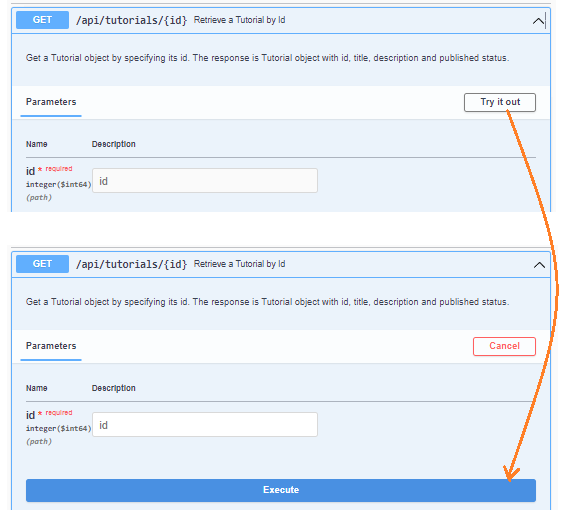
If you open an API endpoint, you will see structure of the request and response like this:
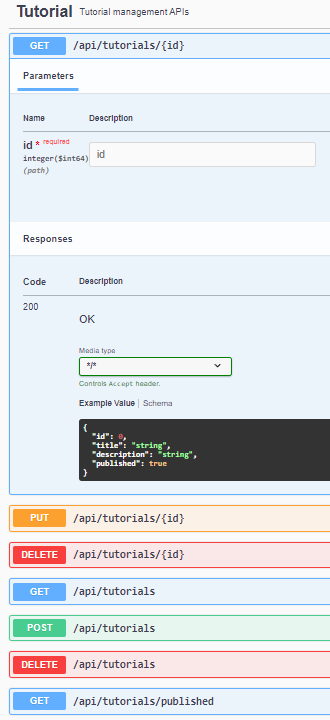
We’re gonna use Swagger 3 annotations to customize description with more details.
@Tag(name = "Tutorial", description = "Tutorial management APIs")
@RestController
public class TutorialController {
// ...
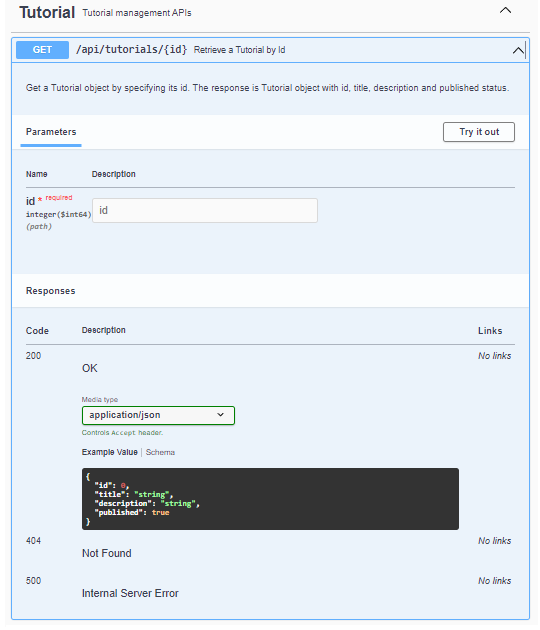
@Operation(
summary = "Retrieve a Tutorial by Id",
description = "Get a Tutorial object by specifying its id. The response is Tutorial object with id, title, description and published status.",
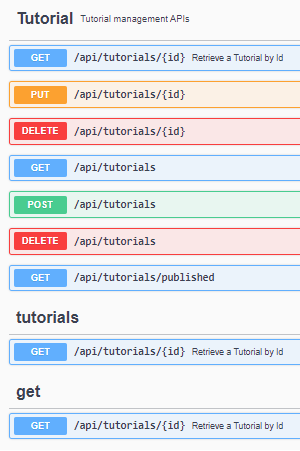
tags = { "tutorials", "get" })
@ApiResponses({
@ApiResponse(responseCode = "200", content = { @Content(schema = @Schema(implementation = Tutorial.class), mediaType = "application/json") }),
@ApiResponse(responseCode = "404", content = { @Content(schema = @Schema()) }),
@ApiResponse(responseCode = "500", content = { @Content(schema = @Schema()) }) })
@GetMapping("/tutorials/{id}")
public ResponseEntity<Tutorial> getTutorialById(@PathVariable("id") long id) {
// ...
}
// ...
}
Check it again, the Swagger UI shows more information.
And more tags are displayed:
For more details and practice on Swagger 3 annotations, please visit:
Swagger 3 annotations in Spring Boot
Swagger Configuration in Spring Boot
We can configure our API documentation by specifying properties in the spring configuration file. These properties can be classified into OpenAPI and Swagger UI properties.
- OpenAPI properties specify how the project should be scanned to identify API endpoints and create documentation based on them.
- Swagger UI properties helps us to customize the user interface of our API documentation.
All of these properties start with the prefix springdoc. For a complete list of these properties and their purposes, please visit Springdoc-openapi Properties.
The following is a sample of a configuration you can use:
application.properties
#springdoc.api-docs.enabled=false
#springdoc.swagger-ui.enabled=false

springdoc.swagger-ui.path=/bezkoder-documentation
springdoc.api-docs.path=/bezkoder-api-docs

springdoc.packages-to-scan=com.bezkoder.spring.swagger.controller
springdoc.swagger-ui.tryItOutEnabled=true
springdoc.swagger-ui.operationsSorter=method
springdoc.swagger-ui.tagsSorter=alpha
springdoc.swagger-ui.filter=true
– Use api-docs.enabled=false if you want to disable springdoc-openapi endpoints.
– Use swagger-ui.enabled=false to disable the swagger-ui endpoint.
– api-docs.path is for custom path of the OpenAPI documentation in Json format. Now it is http://localhost:8080/bezkoder-api-docs.
– swagger-ui.path is for custom path of the Swagger documentation. If you visit http://localhost:8080/bezkoder-documentation, the browser will redirect you to http://localhost:8080/swagger-ui/index.html
– packages-to-scan=packageA,packageB: list of packages to scan with comma separated.
We also have packages-to-exclude, paths-to-match, paths-to-exclude.
– swagger-ui.tryItOutEnabled if you want to enable “Try it out” section by default.
– swagger-ui.operationsSorter: ‘alpha’ (sort by paths alphanumerically), ‘method’ (sort by HTTP method) or a function.
– swagger-ui.tagsSorter: ‘alpha’ (sort by paths alphanumerically) or a function.
– swagger-ui.filter: true/false to enable or disable filter the tagged operations. We can set a string, the filtering will be enabled using that string as the filter expression which is case sensitive matching anywhere inside the tag.
You can also use enable-spring-security, enable-hateoas, enable-data-rest…
For more properties and details, please visit Springdoc-openapi Properties.
Conclusion
Today we’ve known how to use Swagger 3 in Spring Boot example for OpenAPI 3 Specification. We also make configuration for API description and response example using some Swagger annotations.
Happy Learning! See you again.
Further Reading
Fullstack CRUD App:
– Spring Boot Thymeleaf example
– Vue + Spring Boot example
– Angular 8 + Spring Boot example
– Angular 10 + Spring Boot example
– Angular 11 + Spring Boot example
– Angular 12 + Spring Boot example
– Angular 13 + Spring Boot example
– Angular 14 + Spring Boot example
– Angular 15 + Spring Boot example
– Angular 16 + Spring Boot example
– React + Spring Boot example
More Practice:
– @RestController vs @Controller annotation
– Spring Boot WebFlux Rest API example
– Secure Spring Boot with Spring Security & JWT Authentication
– Spring Boot Rest XML example – Web service with XML Response
– Spring Boot + GraphQL example
– Spring Boot File upload example
– Spring Boot Pagination and Sorting example
Source Code
The complete source code for this tutorial is on Github.
More Swagger 3 annotations example.
You can also apply the code easily on following Projects:
– Spring Boot 3 Rest API example
– Spring Boot Rest API with H2
– Spring Boot Rest API with MySQL
– Spring Boot Rest API with PostgreSQL
– Spring Boot Rest API with MongoDB
– Spring Boot Rest API with SQL Server
– Spring Boot Rest API with Cassandra
– Spring Boot Rest API with Oracle
Caching: Spring Boot Redis Cache example